Thursday, October 30, 2014

Quick, Easy Peasy Curtains

Since we moved my oldest crazything into her new bedroom in September, it's still October, so I'm not that far behind, she has been asking for curtains to go with her quilt that I made her, which you can read about here. Well, life FINALLY slowed down for a day and I needed to have a quick finish to say I did something productive this week. Is it just me that needs that feel good feeling when you crossed something off of the To Do list that's been on the To Do list forever? So during nap time for the youngest crazything, yesterday I got these curtains started and finished AND hung up. It took me an hour and a half to do everything.
So here is how I made these Quick, Easy Peasy Curtains.

I had two yards of Frozen material laying around, doesn't everyone with young kids, lol. They fit perfectly into her window. She doesn't need a lot of curtain, just enough to keep the sun out during the summer when she goes to bed or lightening when it storms.

Did I mention this material is very glittery too? 
 
I wanted two curtains, one to hang on either side of the window. I folded the material in half, with salvage ends together. Then I ironed the material with right sides together to get a crisp fold. Then, I barely, barely, cut the folded end to give me two halves of equal width. I also squared off the top and bottom edges at this time too.


Next, I hemmed the long sides of each curtain with a half inch hem. This is how I hem, feel free to do the hem the way you are most comfortable with and at the size of hem you want. I took my long, 24 inch ruler and mark a 1 inch line with chalk all the way down each side I want to hem at the moment. I will talk about hemming the tops and bottoms in a minute.

Fold the fabric up to that line over at your ironing board. I start at one end and use my iron as a hold spot and continually move my free hand folding the fabric up to the marked hem line and then ironing what was just folded over with the iron. (I think that makes sense) Then, you can go back to the start on the same side or flip your fabric around to the other side and iron fabric up to the hem line. Once you have the first fold down, I then used the raw edge of the fabric to create another fold, this encases the raw edge into the hem. I just folded over at the raw edge line, ironing as I went, just like the first time folding the fabric over. From there, I went straight to my sewing machine, no pins since the fold should be nice and crisp from just been ironed and using my quarter inch foot, I sewed down the hem on both long sides of each set of curtains. You can sew closer to the far edge of the hem if you wanted to.

Now for the top and bottom. I just wanted to be quick about the project, so hemmed both the tops and bottoms at the same time. This time, I knew I was pushing the length of the curtains, so I wanted to keep as much as possible. I drew my line at 3/4 of an inch instead of the full inch. Quarter inch hemming is a pain, I think, 3/4 of an inch just gives you a little more fabric to grab a hold of. Again, I folded and ironed the fabric up to the hem line, then turned the fabric under again using the raw edge as my guide. Back over to the sewing machine and sewed another quarter inch seam.

Great! Now tops, bottoms and sides are all hemmed. Now to figure out how much you need to turn over on the top to create a loop for your curtain rod to go through. I "dry" fit mine, the only time I used pins on the entire project (I tend to use a lot of pins, when pinning).
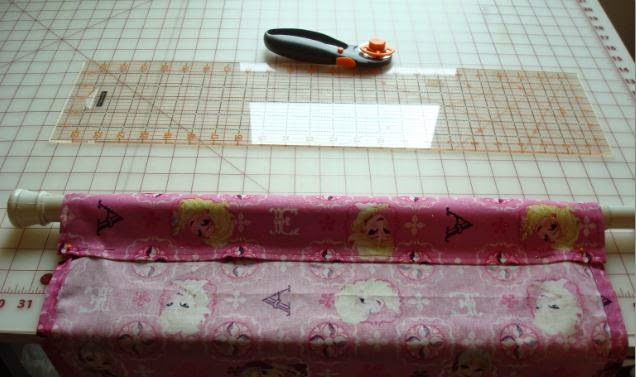

Anyway, mine looked nice with three inches of the top folded over. I finger pressed the  three inches of the top down and back over to the sewing machine. Sewing on the BACK, I used the hem seam as my guide to keep a straight seam across the top as I sewed the top fold into place. VoilĂ ! Finished!  I easily slipped the curtains onto the rod and hung them up. Now the room glows pepto pink when the sun hits them, but hey, she likes them, so I like them.
Before and after photos:


Linking up with NTT over at My Quilt Infatuation and Finish it Up Friday over at Crazy Mom Quilts
Thanks for reading,
Just a Mom who Sews

Tuesday, October 28, 2014

Star Light Star Bright Quilt-A-Long

Have you ever done a Quilt A Long with another blogger? I did this spring over at Happy Quilting with Melissa. First off, of you haven't visited her blog, you are missing out! She has all kinds of wonderful tutorials, videos, former quilt-a-longs and her blogs are wonderful sources of quilty info.

For this quilt-a-long, I chose the single star, picnic size. She has multiple sizes with up to four stars across.

I decided that my oldest crazy thing would use this as her bed quilt. She helped picked the fabrics, both front and back.
For a quilt-a-long each week you get an assignment. The quilt is usually broken down anywhere from six to eight week assignments. Bonus, for getting your week's assignment done, a chance at weekly prizes!! Now if that's not motivation, I don't know what is. :) I must pat myself on the back here and say I completed each week's assignment. I did not make it to the finished quilt parade, but I had it done in the next week. Hand binding takes awhile, is my excuse and I'm sticking to it! Lol I quilted this one in purple variegated thread in a circular pattern.


Here it is in it's final resting place, for now. My crazy thing has a hard time deciding which side to have up for the week, fairies or frozen. Yes, the frozen craze is still strong at my house.

Thanks for reading!
Just a Mom who Sews

Friday, October 24, 2014

Sad Day

Last Saturday was a sad day at my house. My Grandmother passed away. So not much has gotten done in the sewing room since Friday. I wanted to share this quilt that I made her back in 2010.
Okay, so the pictures aren't great, but all I had was my ipod, not my good camera.
 

I wanted something very light weight, but also something that would keep her warm. I tried a crazy quilt pattern, but it didn't turn out that way. I still like the way it turned out. It reminds me of a house in the center and layers extending around the house. Just like a family, you start from a house of love and it keeps getting bigger and bigger as new members are added.

Since I sewed the strips onto a muslin, I just used a purple fleece as the backing to keep it light. I used some of her stash that she had given me, which is what prompted the quilt being made in the first place, as a Thank You. You can't tell purple was her favorite color, can you? I will miss you Grandma, but I know you are watching over us now.

Thanks for Reading!
Just a Mom who Sews

Friday, October 17, 2014

MIA

Sorry I have been MIA for a while. I have been doing what I love, sewing; every spare minute of the day and night. Is it bedtime yet?? Or at least naptime? =) No fun pictures to share with you, just Olaf hats and Costumes, which you can read about here. I have had lots of time to let me mind wander as I sew. Lots of topics I want to write about. One involves stealing borrowing your husband or mate's tools to complete sewing projects. Hmmm, how did all these get here?

Thanks for reading!
Just a Mom who Sews