Sunday, June 29, 2014

Shipshewana Bus Trip 2014 part 1

Whew! What a day/weekend it has been. I promised photos from the trip so in this post I will show all the pictures I took at the actual Shipshewana Quilt Show. More on the shopping later ;)
My tastes where very different from the judges of this show. But hey that's what makes the world go round and then different quilts have chances to win at different shows, right?
This quilt was my very favorite quilt of all the quilts there. I DID vote for it as the fan favorite, I do hope it won!!
 View from the side. It was hard to get a photo of this quilt with so many people admiring it.
I just love the swirling color affect. The note posted said a 4 degree rotation on the squares. That sounds complicated. Different styles of compasses were displayed on the edges of the quilt.
Here is another quilt that I liked at the show that wasn't a winner in the judges eyes, but I would have put it in the winner's circle...
The top winner at this years' Shipshewana's Quilt show was a piece called Rising Ferns.
It's beautifully done, just not my style. Bling was in this year. Lots of winners had sequins, rhinestones, etc. on their quilts. I like the modern, but simply stated quilts. I actually liked the back of the quilt better then the front, go figure. Does anyone else see Octopus's arms coming out of the water or is it just me?
 
These quilts were also in the winner's circle, these I liked, but still not as much as my fan favorite choice...
 I liked the orange,teal and green in this quilt. Not a common color combo in quilts.
The name of this quilt was One A-Maze-ing quilt. It made me laugh. I could spend hours looking for the end of the maze.
I am not a huge fan of black background quilts, but this one I did like. I really liked the quilting in a variegated rainbow thread. I must have been in a rainbow mood on Saturday. My favorites are the rainbow ones. Here is a close up of the thread/quilting

 
Finally they had Quilts of Valor on the cars at the Hudson Car Museum. Each quilt was very different from each other. From very simple to take your breath away complicated. I was too busy looking at the quilts and okay, I'll admit it, some of the cars too, to take any pictures of the ones on the cars. Here is one that was hanging up with the winners of the show. I think it just says America and Freedom to me.
Well that's it for my opinion on the Shipshewana Quilt Show. I'd go again next year in a heartbeat. Bus Trip 2015 anyone?

Thanks for reading,
Just a Mom who Sews


Friday, June 27, 2014

It's almost Bus Trip Time!!

I am so Excited for my first quilt bus trip tomorrow! I have been on bus trips before and shop hops, but not a combo of the two. I am heading off to the Shipshewana Quilt show and shop hops. While over in Indiana, I will get to explore downtown Shipshewana too. If you live in the Indiana, Ohio, Michigan area Shipshewana is know for their huge flea market. I've been there several times but never downtown or to the quilt shops/show.
 
I must say a huge Thank You for my sewing club for putting this great trip together. I wonder if I will be tired of talking, listening, looking at fabric by the end of the day. My day starts at leaving my house at 4:45am and I hope to be in bed by midnight! That being said, I just can't wait!!! Hope to show lots of pictures of awesome quilts on Sunday!
 
What is your favorite sewing themed trip you have taken?
 
Thanks for reading!
Just a Mom who Sews

Thursday, June 12, 2014

Lightbox stenciling tutorial

When you see all those wonderful crafts that involve stenciling, you think, it can't be that hard, right?? Well that was my first thought when I went to stencil my Anna inspired coronation dress. For me, it was a disaster! The paint was mixing, it wasn't going on well at all. Even after buying the very expensive stencil brushes. Grrrr! So after two panels being "stenciled" and wanting to cry, well maybe I did since everyone was in bed already, I packed it up for the night. Settled down with a glass of wine and tried to come up with an idea or two to make the other 10 or 12, if I redid the first two, go much, much smoother.

I remembered that my wonderful husband had made me a light box to help me trace quilt patterns on quilt tops, many moons ago. i.e. before children.  It's what it sounds like. A box to support the light, in my case an old fluoresce bulb light fixture. I'm sure it came out of our house when we remodeled the house. The light is facing up towards the ceiling. The top of the box is clear plastic so the light can shine through. It was originally glass and after leaning on it too hard one afternoon and putting my elbow through the glass, it became a plastic piece. Hmm, maybe that's why it didn't get much use after that incident.


See how nice my husband is to me? He even stained the box my favor stain, cherry. Yes, my sewing room is gated off. Not from any animals, its gated from the crazythings. Their playroom is the next room over.

So now on to the tutorial of how I stenciled my fabric. I placed the light box on the floor, because that is where I had room at the time and I am still young enough for that not to bother me. =) Place it where ever is comfortable for you to be for as long as you have to stencil your project. I taped the stencil I had cut out of cardboard in the center of the light box. I used an old wrapping paper tube cardboard/paper to cut out the stencil.

Then I taped a huge piece of freezer paper over the top of the stencil and the whole top of the light box. Waxy side facing up so that the paint that soaks through will not cause the fabric to become stuck to the freezer paper.

Finally, I centered the piece of fabric on the stencil. I did NOT tape this down. The cut outs of the stencil will appear as lighted cutouts on the piece of fabric.


I then gathered my paints and brushes and went to work, hand painting each panel. This was much easier for me to hand paint in the lighted areas, basically filling them in so no bright light could be seen at the cut out. It was still time consuming, but I was much, much happier with the results after the first piece done. As an added bonus, the heat from the light helped dried the paint so the panels were almost dry when I removed them from the light box. I placed the "wet" panels on a table covered in freezer paper, yes, waxy side up.

I hope this helps anyone else who is stenciling challenged. =)

Thanks for reading!
Just a Mom who sews


Wednesday, June 4, 2014

Summer Dresses

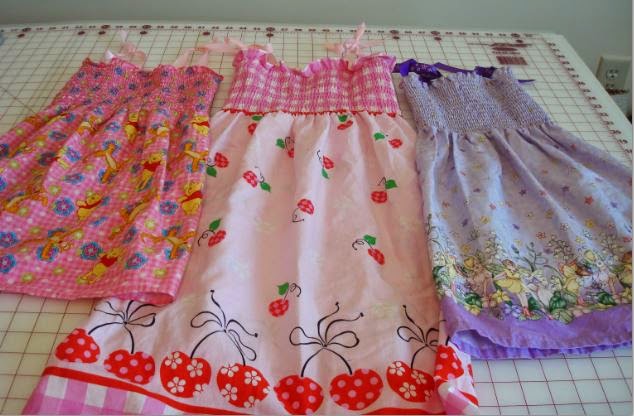
I love things when they turn out quick, easy and as you thought of it in your head, don't you? I was able to wip these three pretties out in about an hour. I wanted something new for the crazythings to wear to a baby shower we were attending later in the day.

If you have a girl and want to wip up a new summer dress and say you made it, this is the dress for you. First measure the width of the chest in inches. I purchased all my fabrics for the dresses at Joann Fabrics. Next, find cute fabric with the gathering at the top and cotton below the gathering. Bonus, it's already hemmed at the bottom. Absolutely no hemming!! Take your cute fabric to the cutting table and get the measured width, plus one inch for the seam. Pick out a coordinating ribbon as ties and thread to sew the dress closed. If you don't have fray stop, pick that up as well.

Once at home, match right sides together and sew dress with a quarter inch seem. Note: you may have to clean up the cutting along the bottom portion of the dress, if it was jaggedly cut. Now you should have a tube. Almost done, isn't that great?!
Here is the back of my three dresses.
Yes, I forgot to take a picture without the ties on, that is the next step. =)

 These two by happy accident matched up the design almost perfectly.
 
Here is a close up of the next step.
   Either eyeball or have your little one try on the dress to find the placement of the ties. I just eyeballed it. I also just eyeballed the length of the ribbon. More is better, you can always cut off if too much, to add more, it involves the frog stitch, rip it rip it. lol =) Sew the ribbon with the right side of the ribbon facing down and the wrong side of the dress facing up. I did two lines across to help with the wear and tear on the ribbon. Also, I sewed a tighter stitch length, closer to 1.75 length then my normal 2.5. I tried my best to stich right in the gathering stiches. Make sure to backstitch at the beginning and end to keep those ties secure. Continue till all four are done. One more step.

Brush on fray stop to all the ends of the ribbon. Including the end that you just stitched to the inside of the dress. I did not brush on the fray stop to the end inside of the dress and boy do I wish I had after washing. Before my crazythings wear them again, I will be doing that step. Step back and smile. You are finished!!!
Ironing the dress maybe necessary before wearing out in public. =) My crazythings loved them. Very light and cool in the hot summer heat.
Linking up with My Quilt Infatuation and Crazy Mom Quilts. (I hope, this is my first blog linky party)
Added Bonus, all three of these fabrics were in my To Do List Pile!

Thanks for reading!
Just a Mom who sews

Sunday, June 1, 2014

Anna Inspired Coronation Dress

I was so blessed to get the opportunity to pattern test this Anna Inspired Coronation Dress. My crazy things are CRAZY about Frozen!! I think even I can sing most songs from the soundtrack. Anyway, here is my version of Anna's Coronation Dress.

It doesn't look like she likes it or anything right? We had to play all the Anna songs before I could get pictures so she could sing and dance about. Seeing her this happy, brought tears to my eyes. But then her first question was when can I make Elsa's dresses. Oh my! What have I gotten myself into!

This dress did take awhile to make, but it was so worth it. It is a very well written pattern with TONS of pictures!! So you are wondering were you can get your hands on this pattern, aren't you?? The direct link to the pattern for sale on Etsy by Made By Marci is here Anna Inspired Coronation Dress Pattern. The hardest part of the whole pattern is the stenciling. I am not a good stenciler. (I think that is a word) So I used a light box, it sounds just like what it's name implies, a box with a light facing up covered by clear plastic. I taped down the stencil, taped freezer paper over the stencil with the waxy side facing up. Then hand painted each of the twelve panels. Once I got the hang of it down, I cruised through the panels. Here is a picture of all twelve laid out to dry.
 
 
Yes, after I get a few more things off of the sewing To Do List, I will try my hand at an Elsa ice dress. 

Thanks for reading!
Just a Mom who Sews


Busy Week!

I have been a sewing fiend this week! lol That is not a bad thing in my eyes, my family's opinion, well...
This weekend I attended a baby shower for my husband's cousin. This is my sewing contributions to the gift.
 
Three burp cloths, a minky blanket and a taggie blanket. This is the first basket I have done that all the fabric were from the same theme, Jungle.
Close up of minky blanket and taggie blanket.

 
Once that was finished, I got to work on another taggie blanket that my sister ordered for a co-worker of hers. My favorite baseball team would have to be the Detroit Tigers, so working on this was fun for me. Reminded me of when I was young and would go to baseball games, much more frequently then I do now.
 
I finished adding length to my oldest crazy thing's leotard way back in the beginning of May. Now less then a week till her recital, I finally put the finishing touches on the strap.
Before and after pictures
 
And of course, I couldn't finish out the week without adding to my project list, you know since I crossed of several items. Ha! Purchased fabric for an Elsa ice dress. Yup, it's Frozen crazy at my house.

 
What are your finishes this week??
Thanks for reading!
Just a Mom who sews